7.4 KiB
instrument editor
the instrument editor always starts with this section:
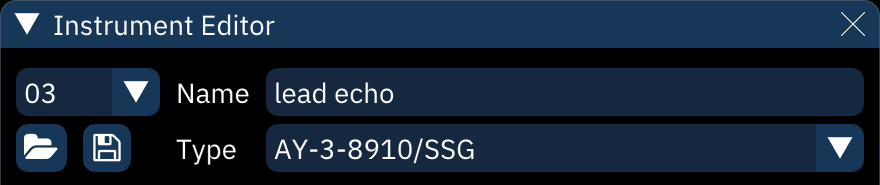
- top-left numeric dropdown: instrument selector.
- folder icon: open an instrument file.
- save icon: save current instrument as a file.
- right-clicking gives the option to save a .dmp format DefleMask preset.
- Name: instrument name.
- Type: the system for which the instrument is intended.
- if changed, all applicable settings and macros will remain as they are. numbers will not be adjusted.
depending on the instrument type, there are many different types of instrument editor:
- FM synthesis - for use with YM2612, YM2151 and FM block portion of YM2610.
- PSG - for use with TI SN76489 and derivatives like Sega Master System's PSG.
- NES - for use with NES.
- Game Boy - for use with Game Boy APU.
- PC Engine / TurboGrafx-16 - for use with PC Engine's wavetable synthesizer.
- WonderSwan - for use with WonderSwan's wavetable synthesizer.
- AY8930 - for use with Microchip AY8930 E-PSG sound source.
- Commodore 64 - for use with Commodore 64 SID.
- SAA1099 - for use with Philips SAA1099 PSG sound source.
- TIA - for use with Atari 2600 chip.
- AY-3-8910 - for use with AY-3-8910 PSG sound source and SSG portion in YM2610.
- Generic Sample for controlling Amiga and other sample channels/chips like YM2612's Channel 6 PCM mode, NES channel 5, Sega PCM, X1-010 and PC Engine's sample playback mode.
- Atari Lynx - for use with Atari Lynx handheld console.
- VERA - for use with Commander X16 VERA.
- Seta/Allumer X1-010 - for use with Wavetable portion in Seta/Allumer X1-010.
- Konami SCC / Bubble System WSG - for use with Konami SCC and Wavetable portion in Bubble System's sound hardware.
- Namco 163 - for use with Namco 163.
- Konami VRC6 - for use with VRC6's PSG sound source.
- SNES - for use with SNES S-APU.
- Casio PV-1000 - for use with Casio PV-1000.
- C140 for use with Namco C140.
macros
Macros are incredibly versatile tools for automating instrument parameters.
After creating an instrument, open the Instrument Editor and select the "Macros" tab. There may be multiple macro tabs to control individual FM operators and such.

The very first numeric entry sets the visible width of the bars in sequence-type macros. The scrollbar affects the view of all macros at once. There's a matching scrollbar at the bottom underneath all the macros.
Each macro has two buttons on the left.
- Macro type (explained below).
- Timing editor, which pops up a small dialog:
- Step Length (ticks): Determines how many ticks pass before each change of value. Default is 1.
- Delay: Delays the start of the macro until this many ticks have passed. Default is 0.
- The button is highlighted if either of these is set differently from default.
macro types
Every macro can be defined though one of three methods, selectable with the leftmost button under the macro type label:
 Sequence: displayed as a bar graph, this is a sequence of numeric values.
 ADSR: this is a traditional ADSR envelope, defined by the rate of increase and decrease of value over time.
 LFO: the Low Frequency Oscillator generates a repeating wave of values.
Some macros are "bitmap" style. They represent a number of "bits" that can be toggled individually, and the values listed represent the sum of which bits are turned on.
sequence
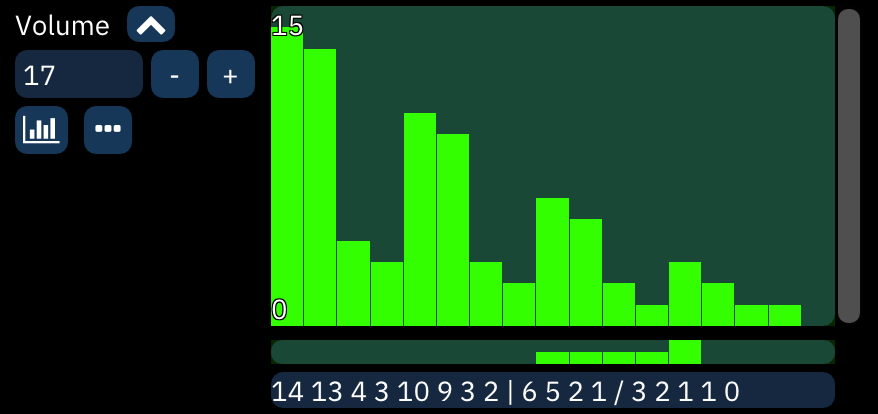
The number between the macro type label and the macro type button is the macro length in steps. The - and + buttons change the length of the macro. Start out by adding at least a few steps.
The values of the macro can be drawn in the "bar graph" box.
Just beneath the box is a shorter bar that controls looping.
- Click to set the start point of a loop; the end point is the last value or release point. It appears as half-height bars. Right-click to remove the loop.
- Shift-click to set the release point. When played, the macro will hold here until the note is released. It appears as a full-height bar. Right-click to remove the release point.
Finally, the sequence of values can be directly edited in the text box at the bottom.
- The loop start is entered as a
|. - The release point is entered as a
/. - In arpeggio macros, a value starting with a
@is an absolute note (instead of a relative shift). No matter the note entered in the pattern,@values will be played at that exact note. This is especially useful for noise instruments with preset periods.
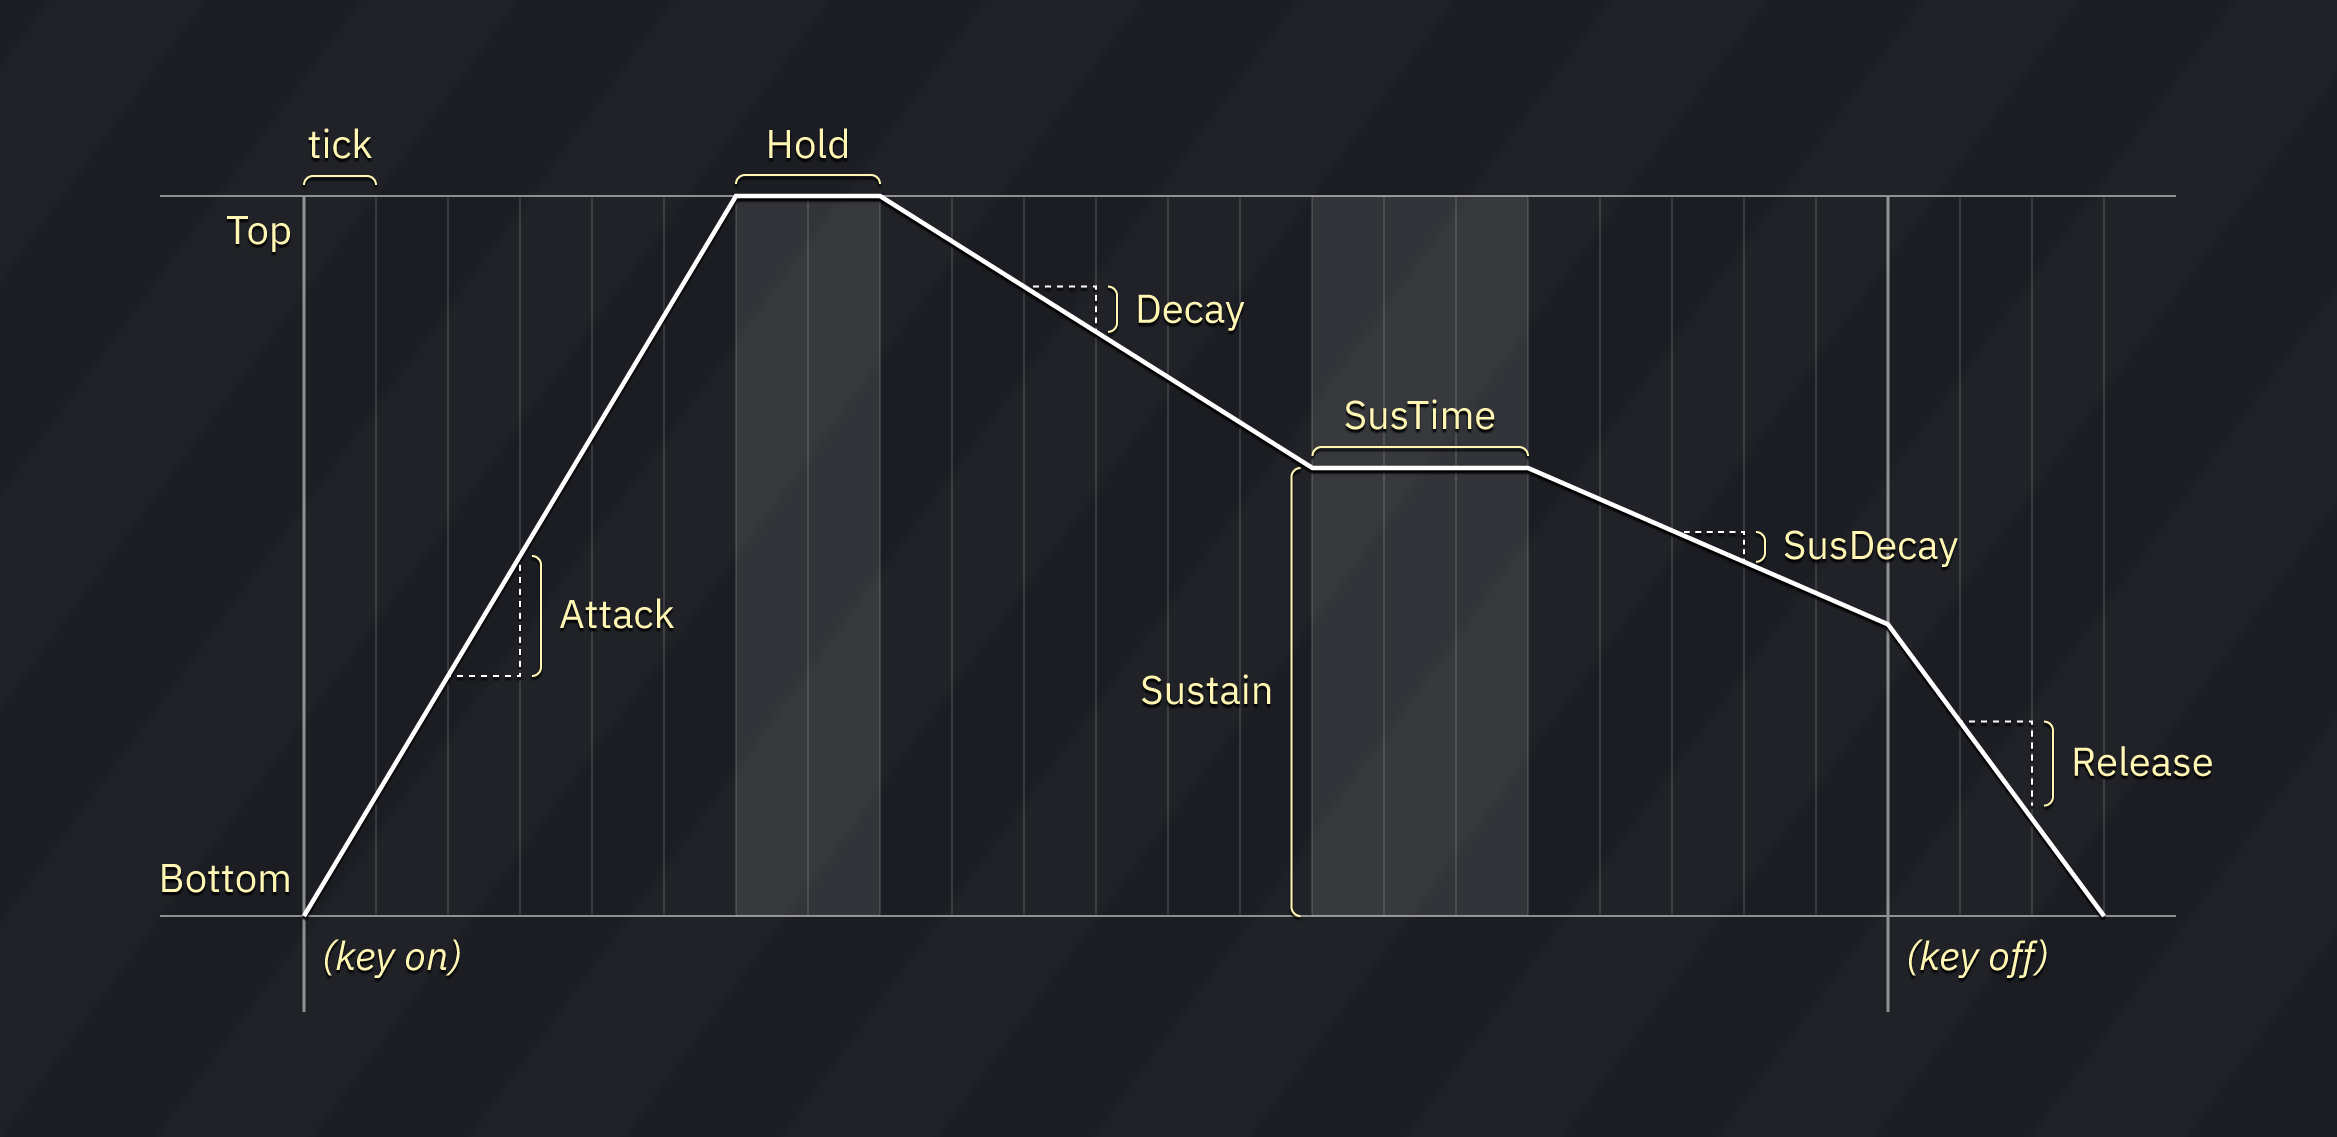
ADSR
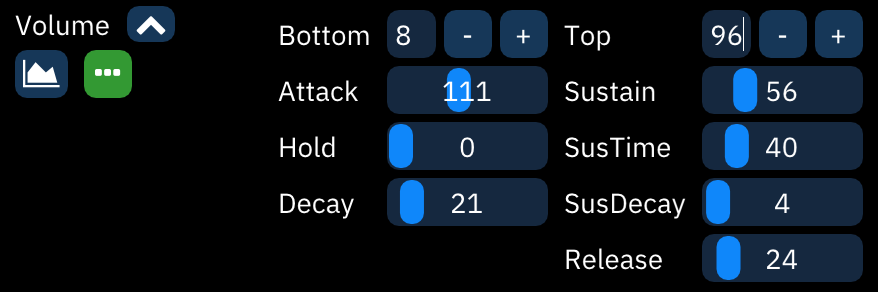
- Bottom and Top determine the range of outputs generated by the macro. (Bottom can be larger than Top to invert the envelope!) All outputs will be between these two values.
- Attack, Decay, Sustain, SusDecay, and Release accept inputs between 0 to 255. These are scaled to the distance between Bottom and Top.
- Attack is how much the value moves toward Top with each tick.
- Hold sets how many ticks to stay at Top before Decay.
- Decay is how much the value moves to the Sustain level.
- Sustain is how far from Bottom the value stays while the note is held.
- SusTime is how many ticks to stay at Sustain until SusDecay.
- SusDecay is how much the value moves toward Bottom with each tick while the note is held.
- Release is how much the value moves toward Bottom with each tick after the note is released.
LFO
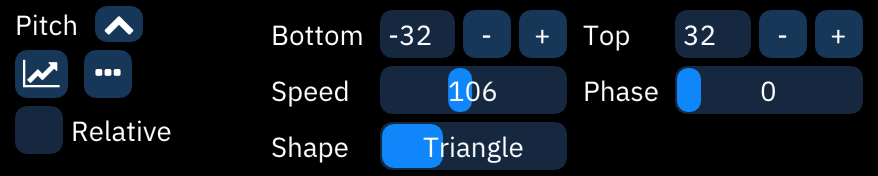
- Bottom and Top determine the range of values generated by the macro. (Bottom can be larger than Top to invert the waveform!)
- Speed is how quickly the values change - the frequency of the oscillator.
- Phase is which part of the waveform the macro will start at, measured in 1/1024 increments.
- Shape is the waveform used. Triangle is the default, and Saw and Square are exactly as they say.
wavetable
This tab appears for PC Engine, FDS, Namco WSG, and other wavetable-based instruments.
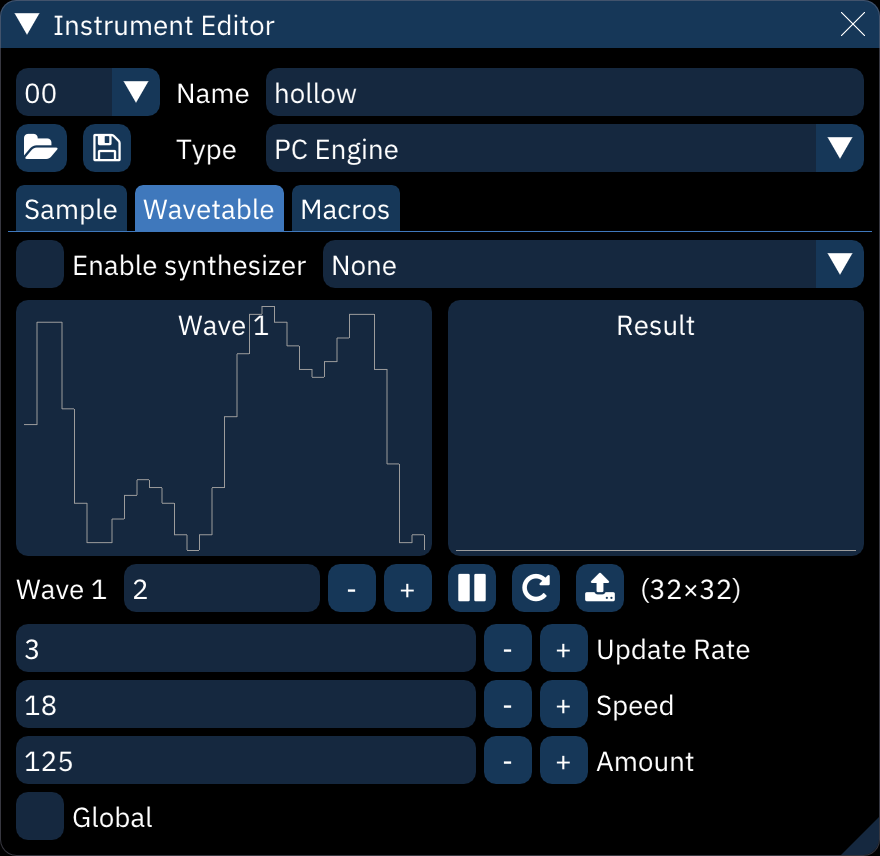
When Enable synthesizer is off, the wavetable used for the instrument may be selected by creating a Waveform macro with a single value.
To use the wavetable synthesizer, refer to the bottom part of the wavetable documentation.
sample
This tab appears for Generic PCM, SNES, Amiga, and other sample-based instruments.
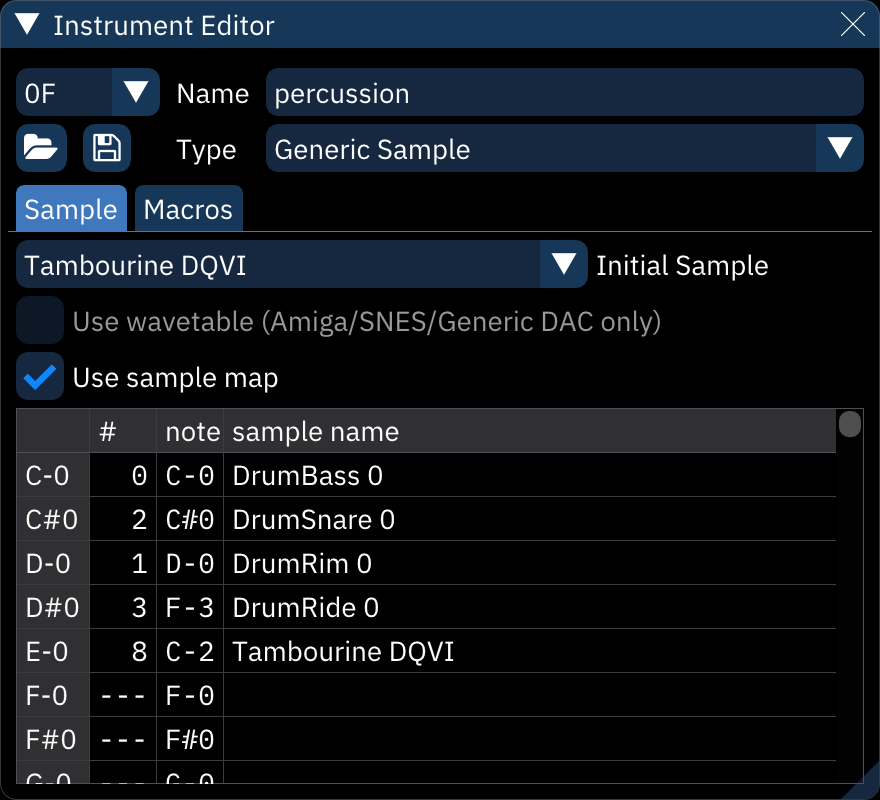
- Initial Sample: the sample that the instrument will use.
- Use wavetable: instead of samples, use wavetables. this causes the Wavetables tab to appear next to Sample.
- depending on the system and use of the wavetable synthesizer, this may or may not be reproducible on hardware.
- Use sample map: assigns a sample to each note.
- to set a note's sample, click the list entry in the "#" column then type the number of the sample.
- to set the pitch at which a sample is played, click the list entry in the "note" column and press the key for the new note.